

Quick Answer
- Unlock the base: complete the photograph, material hand-in and ARC damage stages of Sheltered Retreat in the Outpost tab.
- Build the Research Station first: installation needs 3 Mini Pumps, 35 Planks and 5 Battered Paperbacks.
- Expand, then upgrade: a new Outpost level opens station upgrades, but does not pay their separate material costs.
- Prepare for amplification: reach Outpost level 4, upgrade Gunsmith to IV and obtain your weapon's compatible module. Upgrade Research Station to IV separately for weapon-perk research.
Keep Outpost expansion, station installation and weapon research on separate shopping lists. They are connected milestones, not different names for the same purchase.
Outpost Requirements
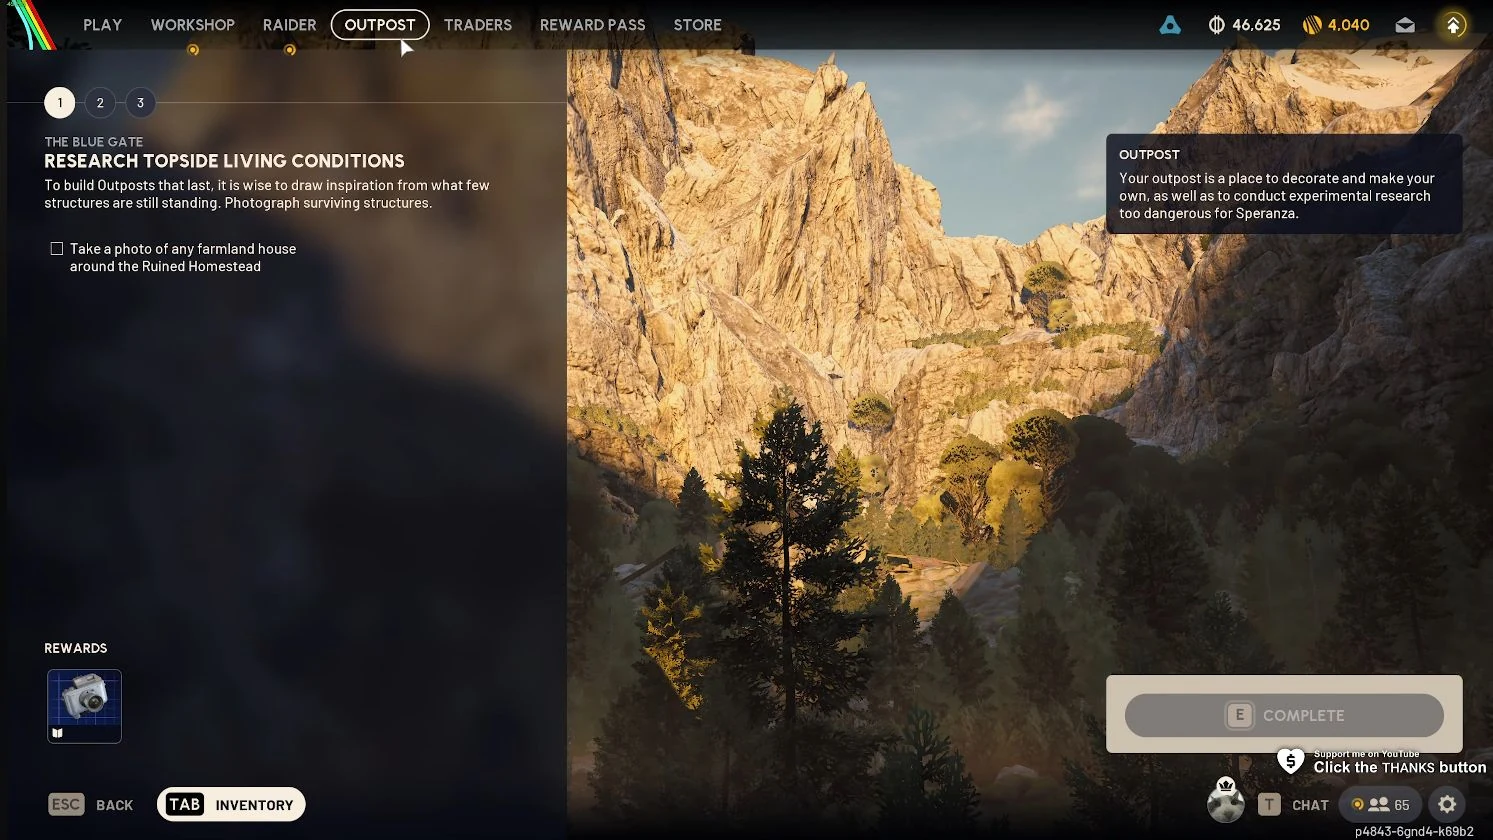
Open the Outpost tab and make Sheltered Retreat your active project before heading topside. You need access to The Blue Gate and a camera in your loadout for the first objective. You must reach Raider level 18 before starting Sheltered Retreat.
For help with level progression before starting the project, explore level boosts.
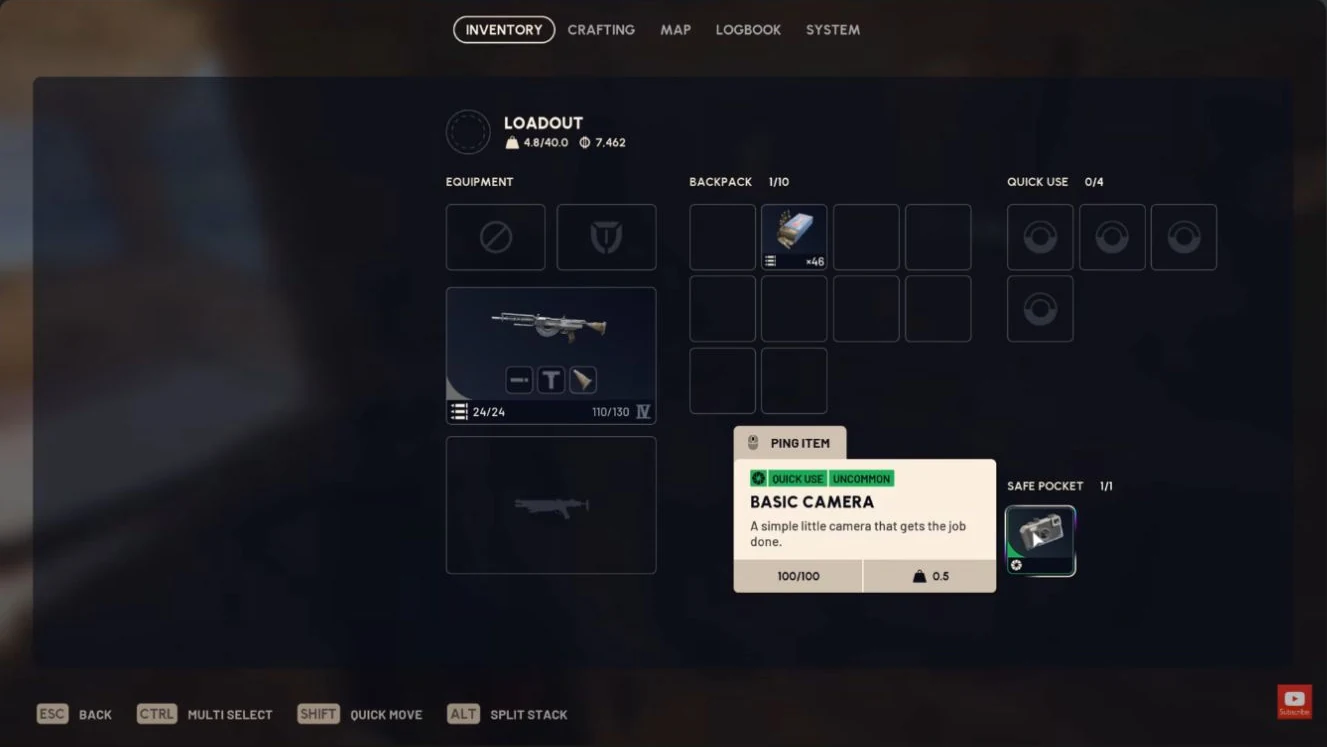
A Basic Camera is enough for the farmland photograph. Choose one of these ways to obtain it rather than waiting for a particular camera drop.
| Camera Option | What to Do |
|---|---|
| Quest supply | Accept Sizing Things Up from Celeste and collect the supplied camera. |
| Trader purchase | Buy a camera from Shani with Coins. |
| Workbench crafting | Craft a Basic Camera at Workbench I with 8 Plastic Parts and 1 unit of Wires. |
| Topside loot | Keep a camera you find during a raid and bring it for the photograph. |
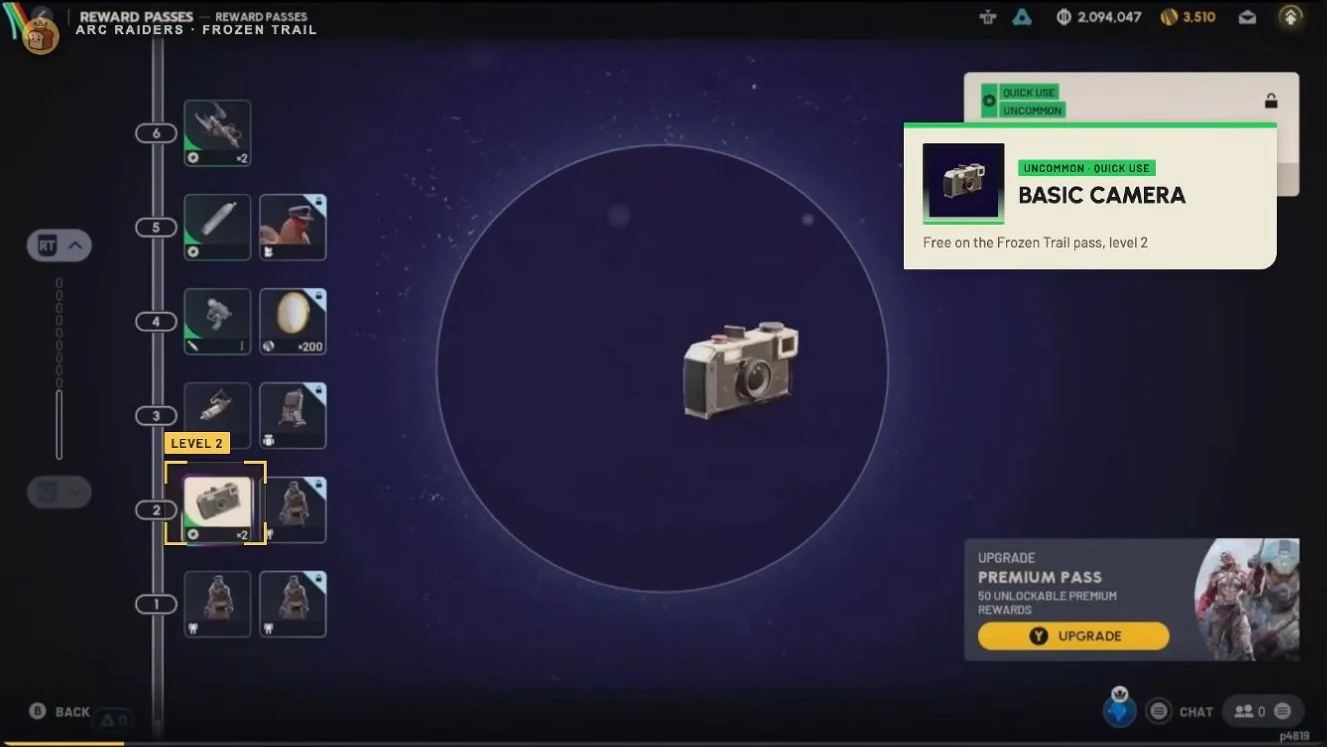
| Reward Pass | Check the Frozen Trail Reward Pass at level 2 for two finished Basic Cameras, not blueprints. |
Move the camera into your loadout before deploying. Owning a camera blueprint is not the same as carrying the gadget. For the later combat stage, bring enough ammunition and healing to fight ARC from cover rather than trying to complete the damage targets with a photography-only loadout.
How to Unlock the Outpost: Sheltered Retreat
Complete the three stages of Sheltered Retreat from the Outpost tab to unlock your base. It is a project, not a trader quest, so use the project screen to review objectives, commit materials and complete each stage.
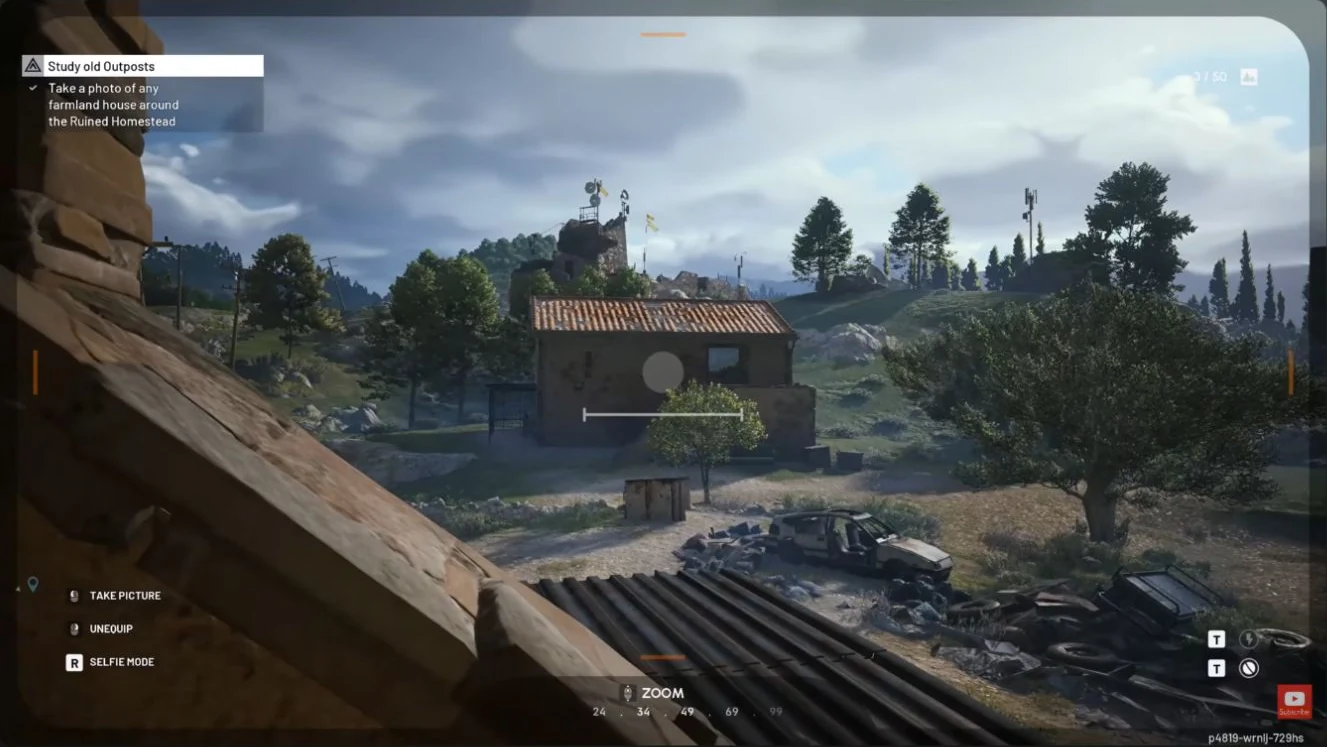
Stage 1: Photograph a Farmland House at Ruined Homestead
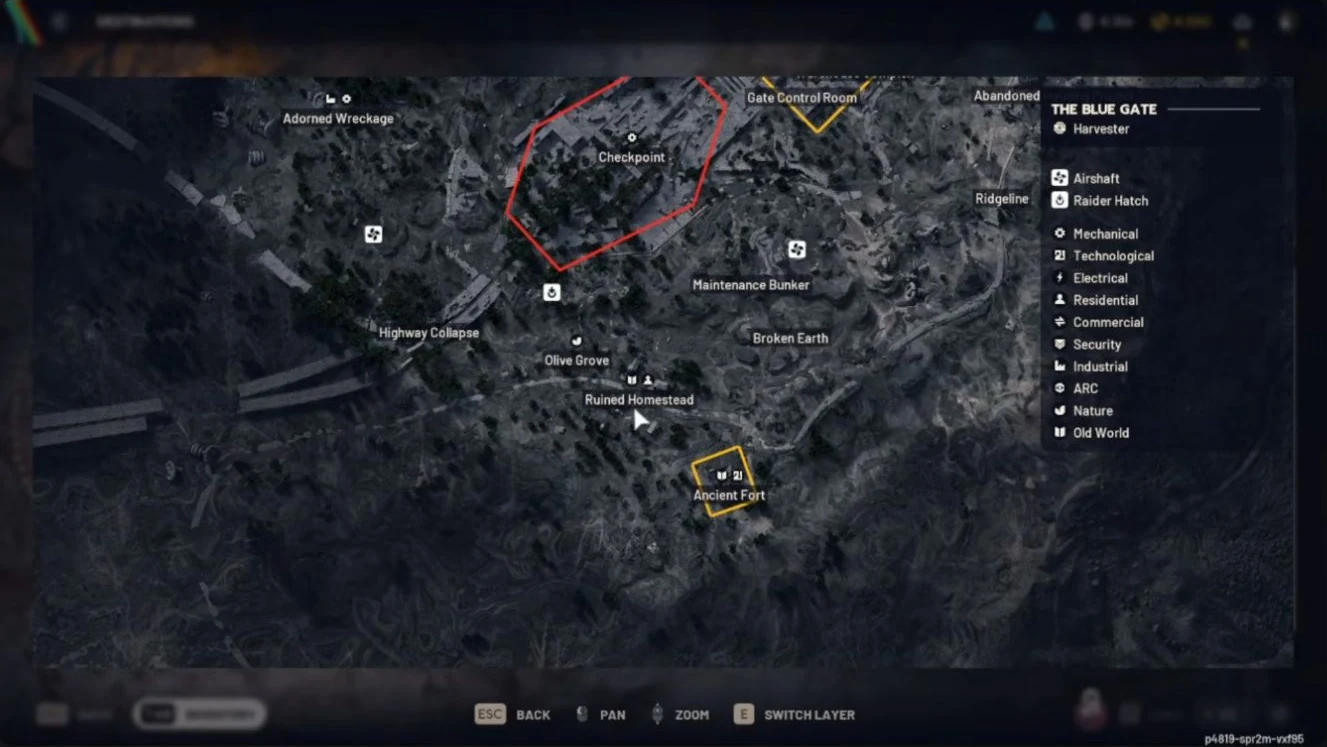
Go to Ruined Homestead in southern Blue Gate, beside Olive Grove and north of Ancient Fort. Look for the surviving farmhouses rather than photographing a random building elsewhere on the map. The objective accepts a farmland house around the homestead, not one uniquely named door or room.
- Deploy on The Blue Gate with your camera equipped in your loadout.
- Travel to the farm buildings at Ruined Homestead beside Olive Grove.
- Find a clear view of a farmhouse, such as the stucco building with a tiled roof and an abandoned car outside.
- Equip the camera, frame the house and use the picture control.
- Check that the farmland-house objective has registered before moving on.
Keep the building itself clearly in frame and avoid having a fence or tree fill most of the view. Simply reaching the homestead does not replace taking the photograph. Plan your approach around the Blue Gate landmarks rather than crossing the map for a specific compass bearing.
The nearby Bees! objective uses Olive Grove. A First Foothold also has an Olive Grove stop, so either can give you another reason to visit this area when that quest is active.
Stage 2: Gather the Building Materials
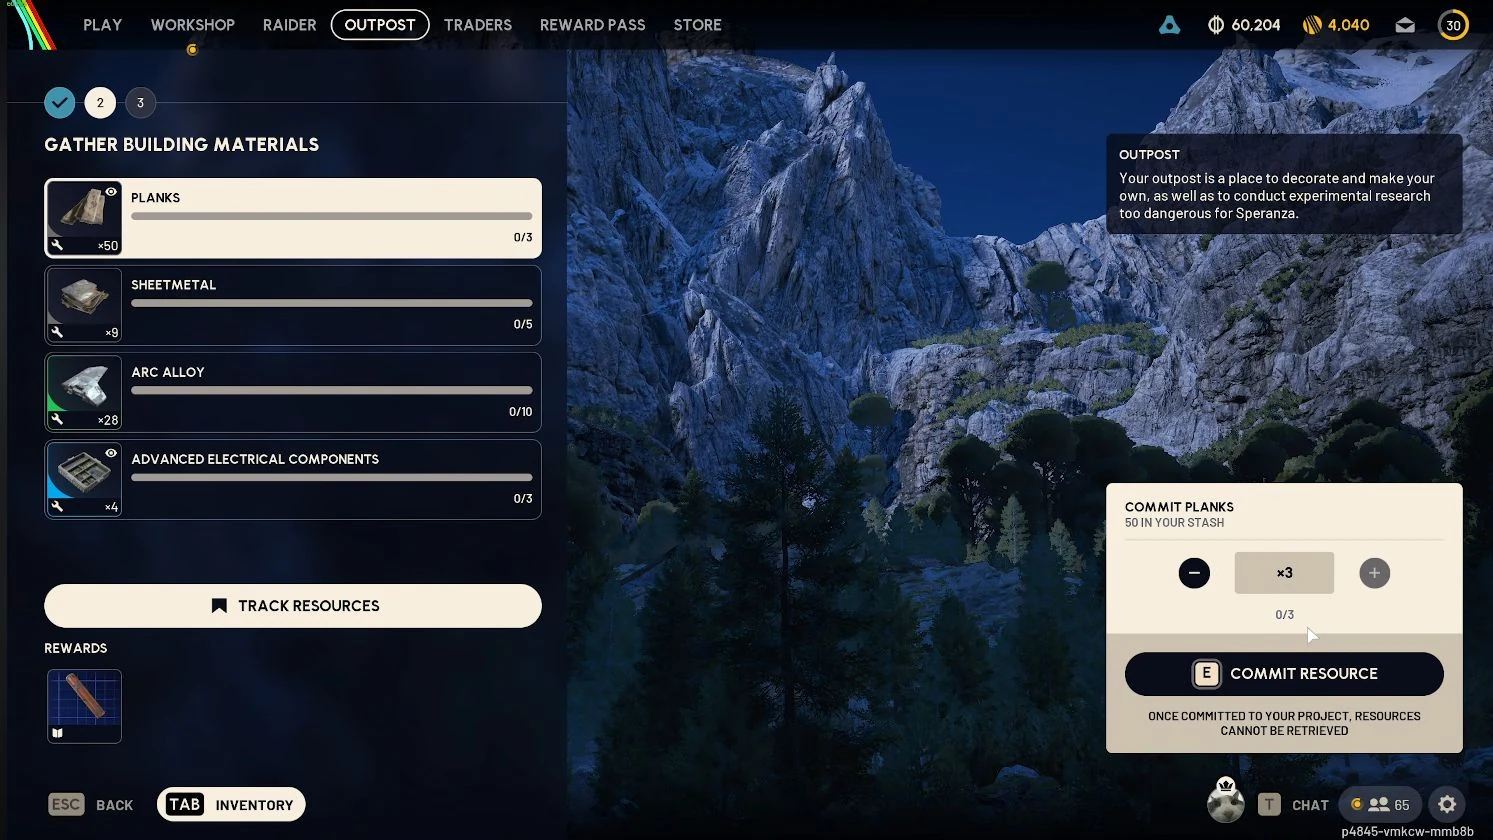
Commit the following resources through the project screen. The hand-in uses items in your stash, so check what you already own before planning another supply run. Committed materials cannot be retrieved, so check the selected amounts before confirming.
| Material | Amount | Where to Get It |
|---|---|---|
| Planks | 3 | Trade with Celeste for 3 Assorted Seeds per item or keep them from topside loot. |
| Sheetmetal | 5 | Trade with Celeste for 3 Assorted Seeds per item or search industrial loot areas. |
| ARC Alloy | 10 | Keep the alloy recovered while salvaging ARC. |
| Advanced Electrical Components | 3 | Use your stash, crafting options or electrical loot. |
Celeste's material trades use Assorted Seeds, which makes her useful for topping up a small Planks or Sheetmetal shortage. These are building supplies for the project hand-in, not materials you need to carry to the farmhouse. Select each resource in Sheltered Retreat and use its commit control.
Stage 3: Safeguard the Building Site
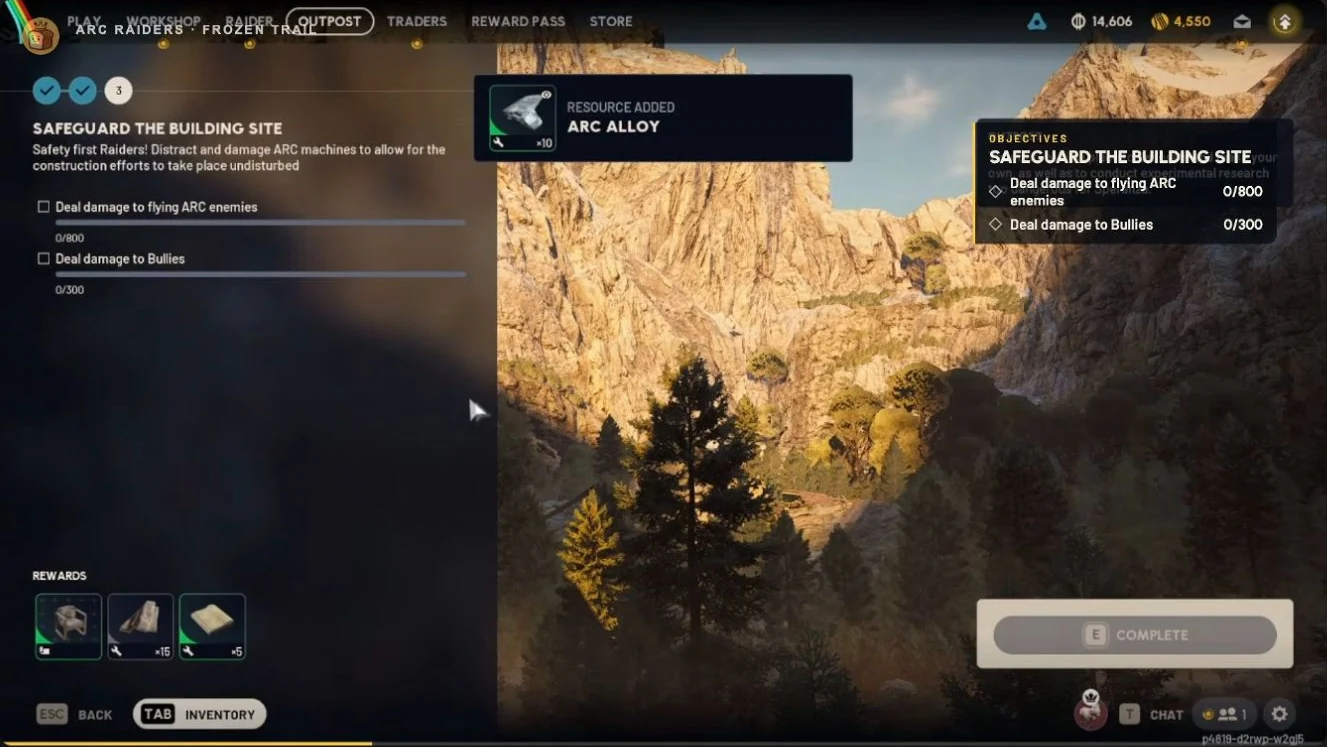
Deal 800 damage to flying ARC, and deal 300 damage to Bullies. These are damage objectives, not requests for a fixed number of kills. Pendola Pass is the map to plan around for the Bully objective.
Use cover and a weapon you can land consistent hits with, then watch the relevant counter as you fight. Once the Bully counter reaches 300, you do not need to turn that objective into a demand to finish off the same enemy. Complete the flying ARC counter as well, then use the Outpost project screen when you are back in the menus.
Sheltered Retreat Rewards
| Stage | Reward | Why It Matters |
|---|---|---|
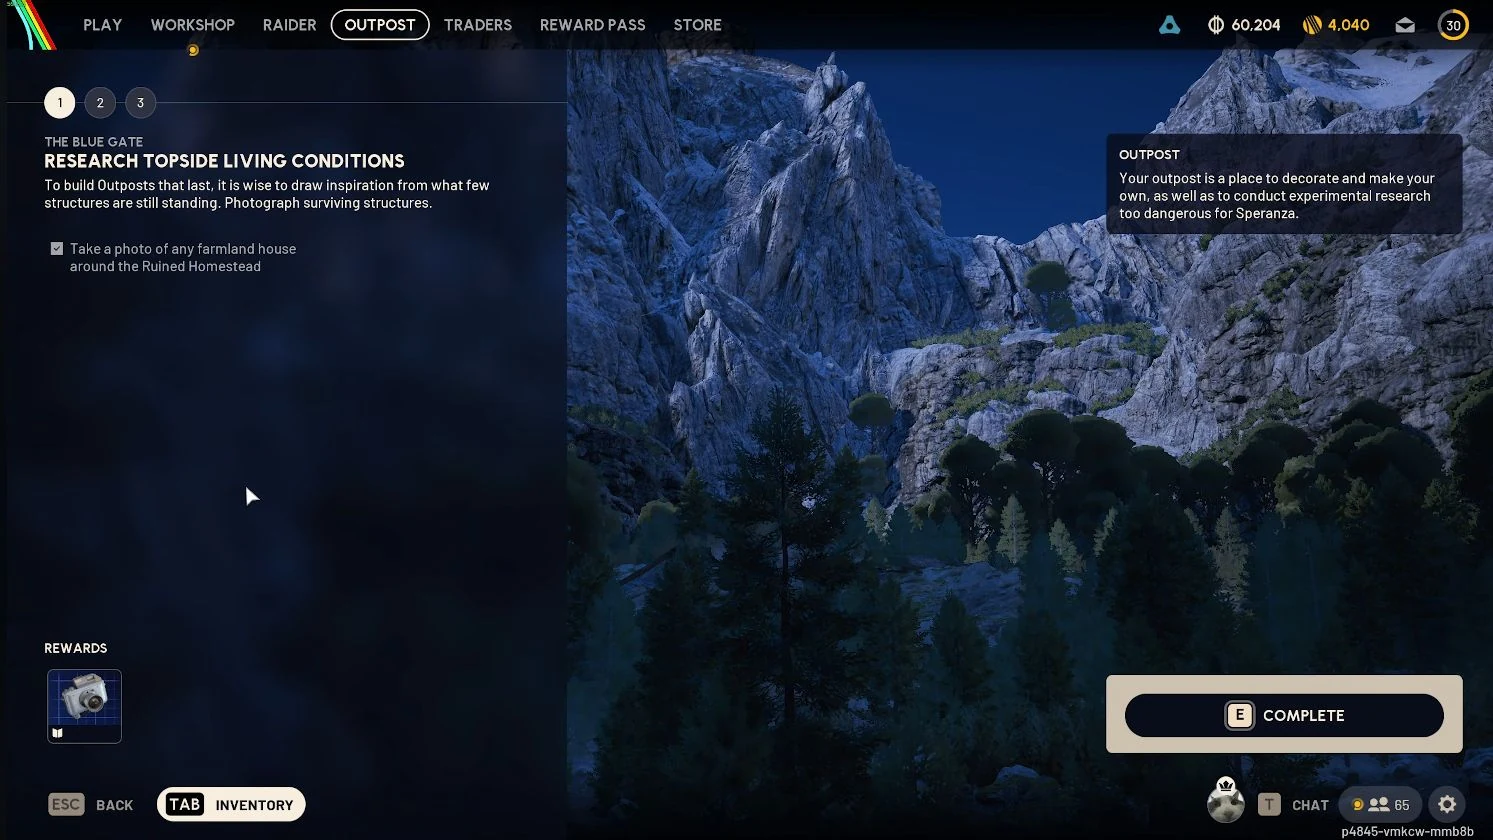
| Research Topside Living Conditions | Advanced Camera Blueprint | Adds a camera crafting recipe to your rewards. |
| Gather Building Materials | Red Light Stick Blueprint | Adds another utility recipe. |
| Safeguard the Building Site | A chair Furniture Design, 15 Planks and 5 Durable Cloth | Gives you decoration and building supplies alongside the completed Outpost unlock. |
Open the Outpost tab after finishing an objective even when it has no notification dot. The tab's stage controls matter more than the notification marker.
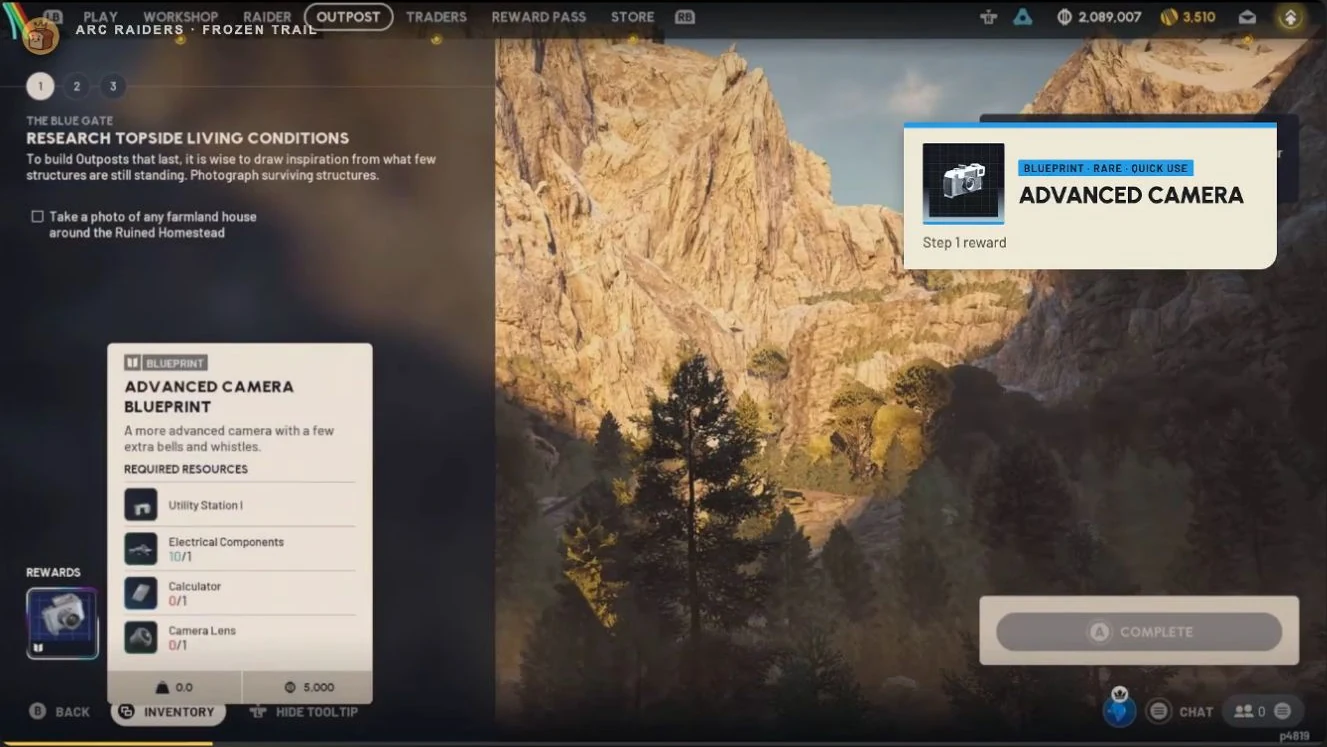
What to Build First
Build the Research Station before spending your early materials on furniture. It opens blueprint research and is part of the route to Amplified Weapons, while furniture changes how your rooms look. Decoration can wait until your next functional upgrade is funded.
Keep the 15 Planks from the final Sheltered Retreat reward for the station. If you save all 15, you need another 20 to meet its 35-Plank installation cost. Also set aside the five Battered Paperbacks rather than selling them while you gather the Mini Pumps.
After installation, choose a blueprint you actually want to use and track the resources for your next station or room upgrade. Expanding at the first opportunity is less useful when you have spent the supplies needed to make use of the new station level. Treat furniture as a separate budget so a room makeover does not delay your weapon plans.
The Research Station
The Research Station, also called the Research Workstation, gives you a way to work toward selected blueprints instead of relying only on random drops. Install it through the Workshop after unlocking the Outpost. Its menu separates blueprint work, Furniture Designs and amplification research.
Research Station Installation and Upgrade Costs
| Station Level | Build or Upgrade | Required Materials |
|---|---|---|
| Research Station I | First installation | 3 Mini Pumps, 35 Planks and 5 Battered Paperbacks |
| Research Station II | Upgrade from Station I | 3 Calculators, 3 Raider Logbooks and 5 Skulker Targeters |
| Research Station III | Upgrade from Station II | 3 Differential Microphones, 3 Exodus Technical Handbooks and 6 Bully Fragmenters |
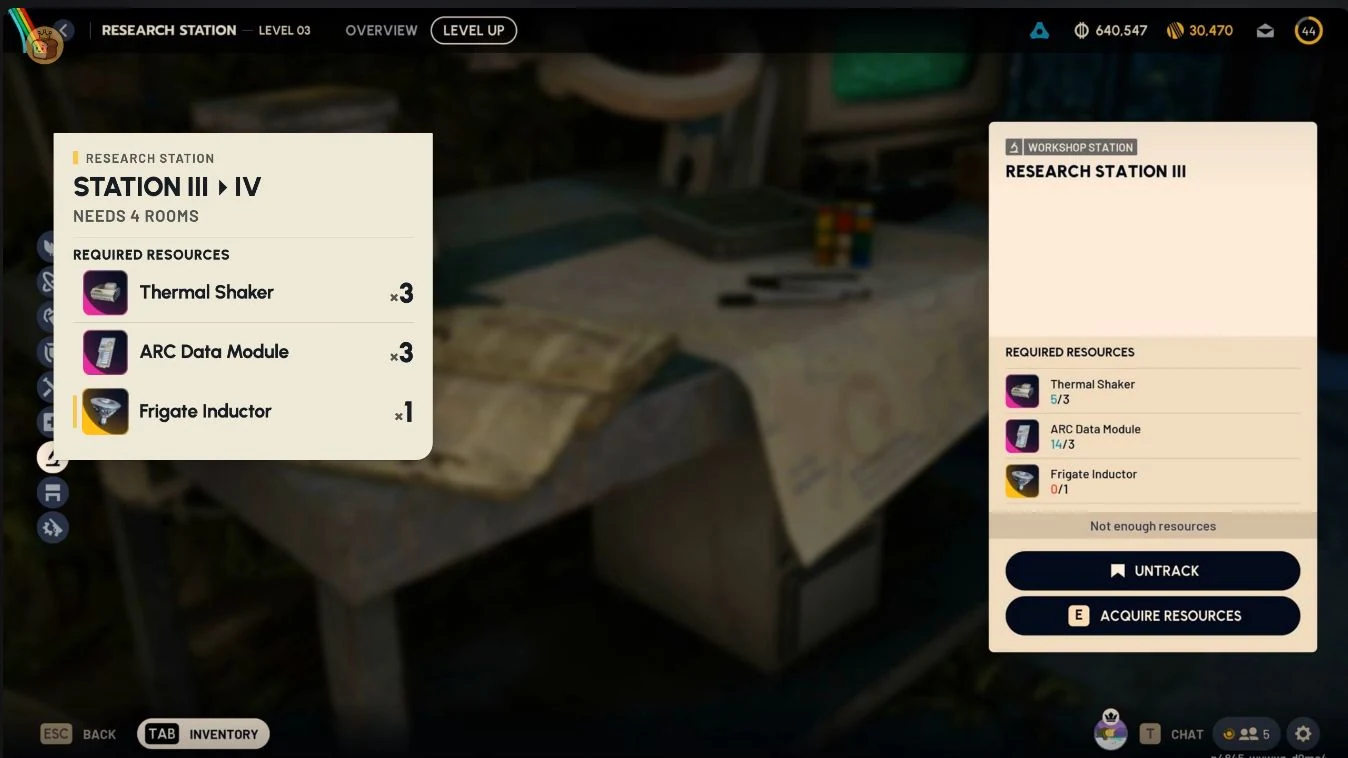
| Research Station IV | Upgrade from Station III | 3 Thermal Shakers, 3 ARC Data Modules and 1 Frigate Inductor |
The LEVEL UP panel displays the station's current level, so a panel headed LEVEL01 upgrades Station I to II. The LEVEL02 panel upgrades II to III, and the LEVEL03 panel upgrades III to IV. Research Station II requires Outpost level 2.
Station installation, station upgrades and room expansion are separate purchases. Expanding the Outpost opens further station upgrades without paying their material costs. Reaching Outpost level 4 opens the level IV station upgrades, but each station still has its own requirements.
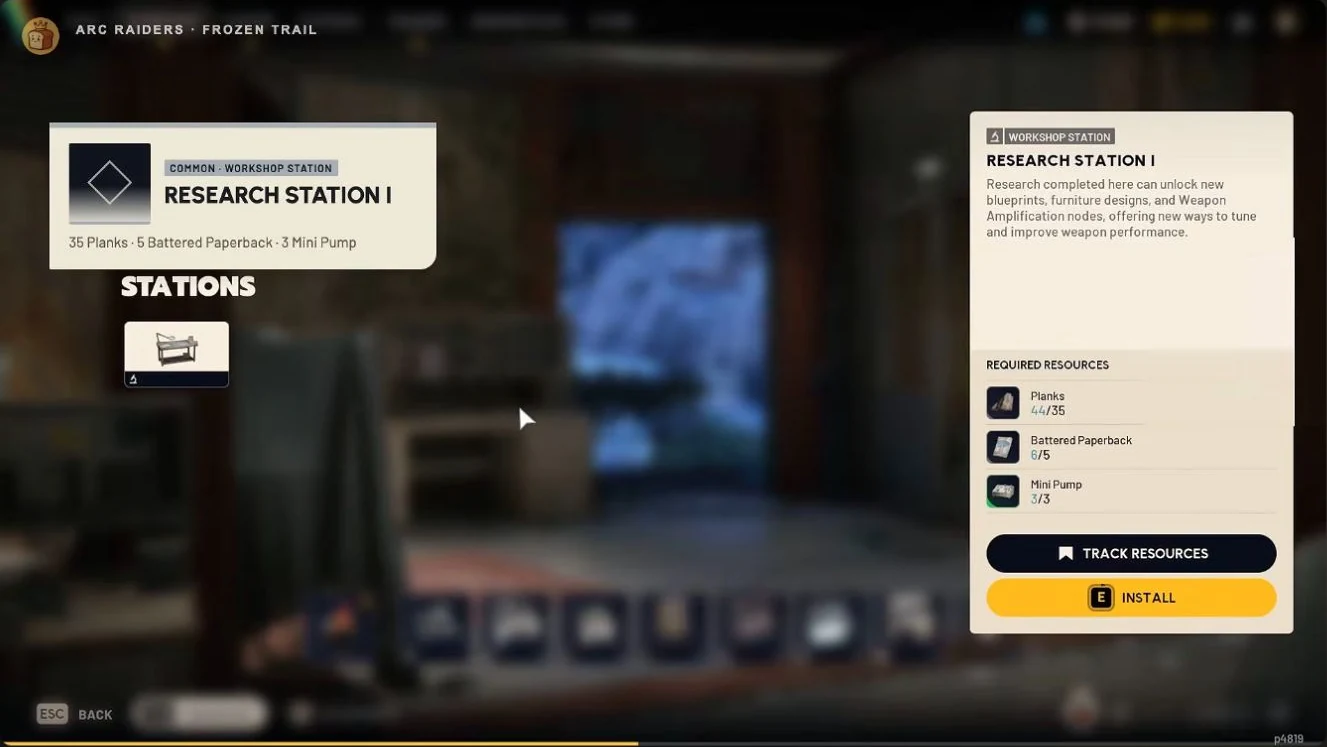
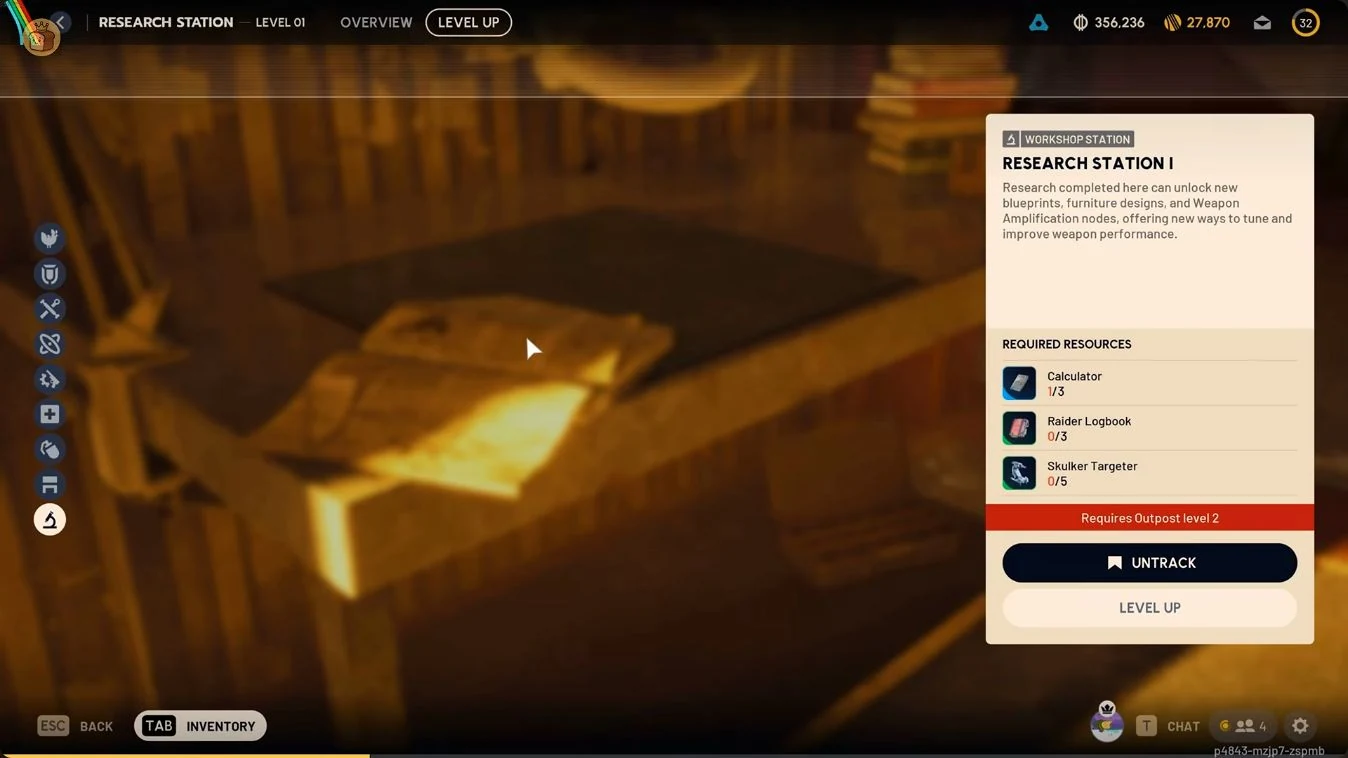
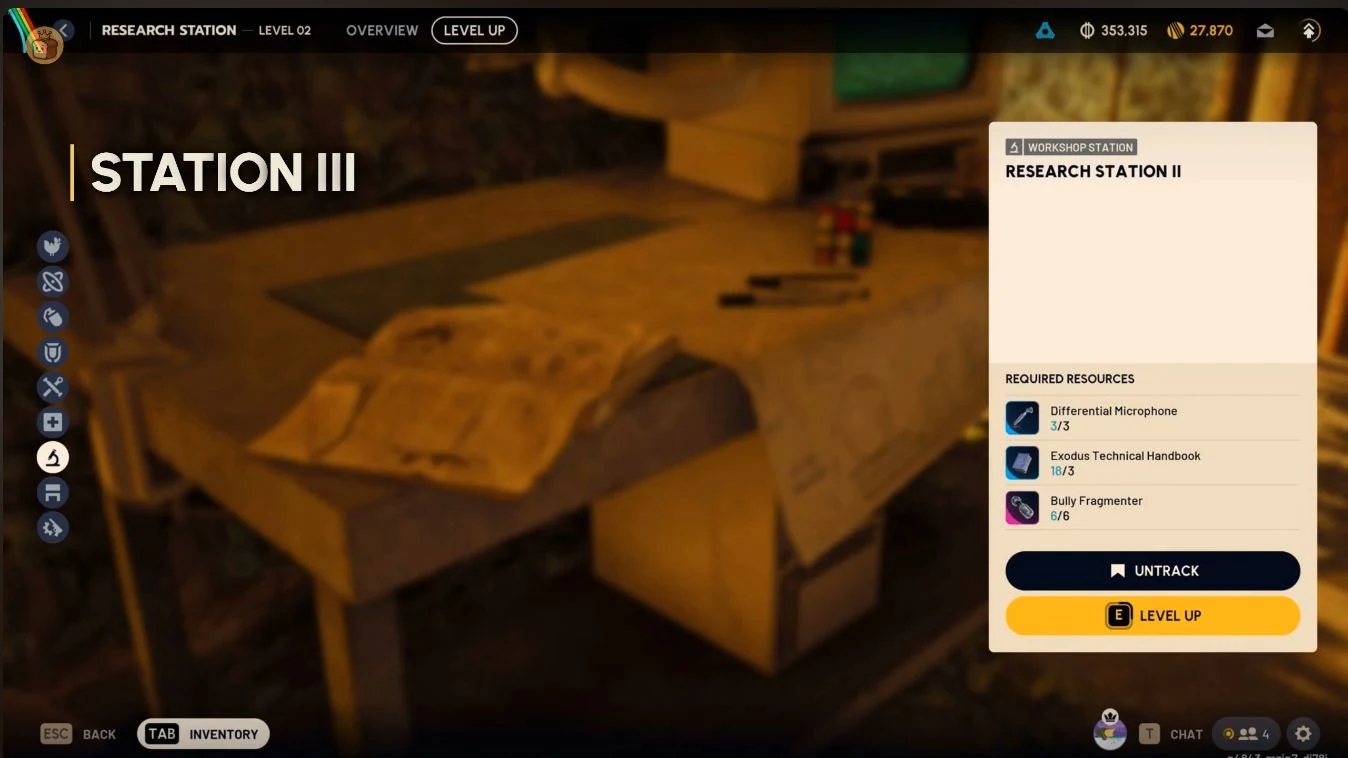
What the Research Station Tabs Do
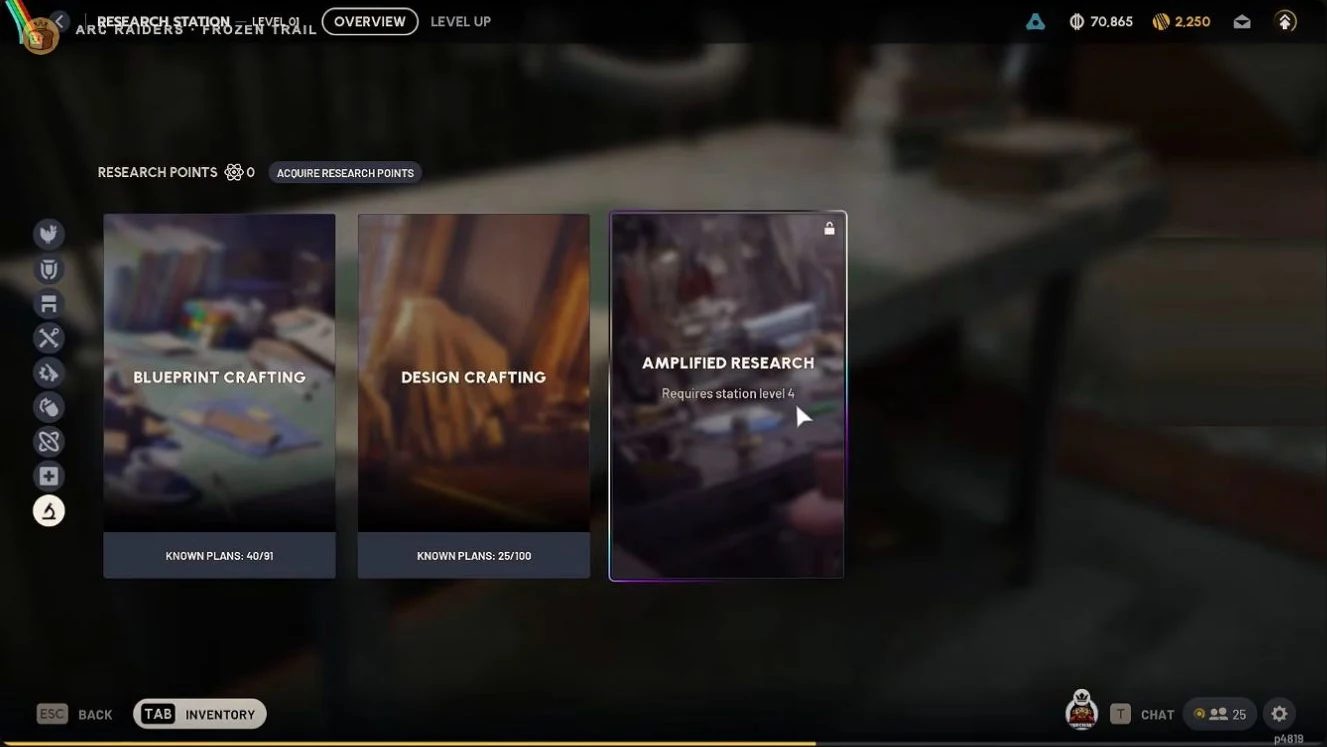
| Tab | Purpose | When to Use It |
|---|---|---|
| Blueprint Crafting | Work toward the available blueprint recipes. | When a missing blueprint is blocking the gear you want to make. |
| Design Crafting | Work on Furniture Designs for your Outpost. | When you want to expand your decoration options. |
| Amplified Research | Research weapon amplification upgrades. | After the Research Station reaches level IV. |
Read the selected recipe's requirements before spending your points. A research project can require materials or a raid objective as well as its Research Points cost. Having enough points does not remove a damage task or another prerequisite shown on that project.
How Research Points Work
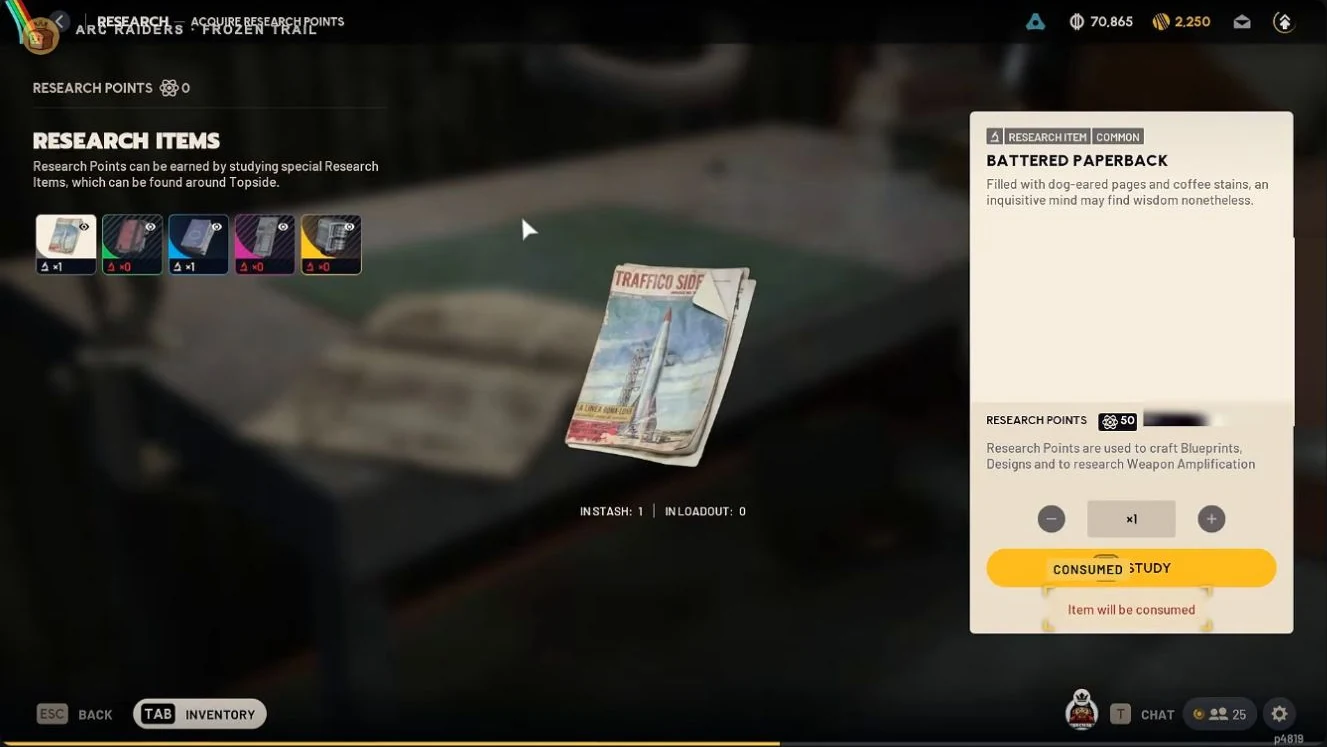
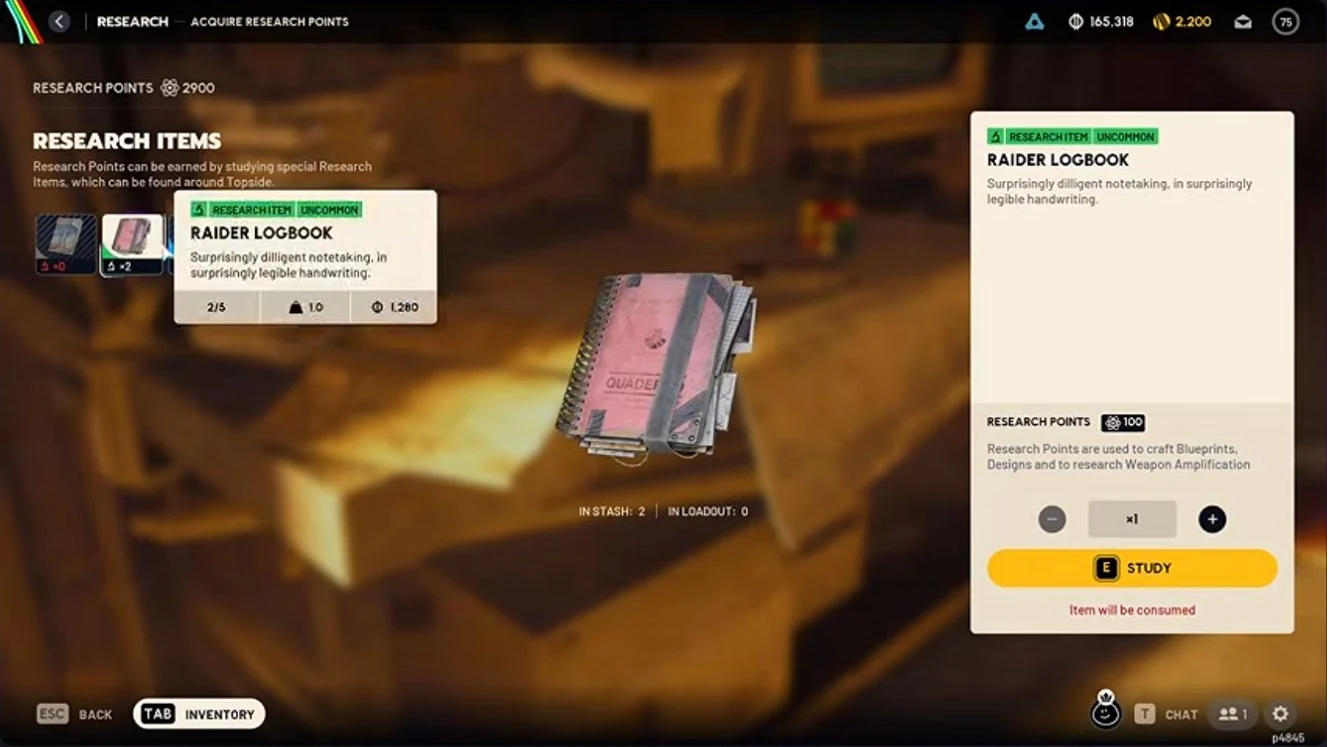
Bring research items back from raids and use Acquire Research Points at the station to turn eligible items into your research balance. Studying an item consumes it, so decide what you want to keep for building or other progression before converting your stash.
| Research Item | Research Points per Item |
|---|---|
| Battered Paperback | 50 |
| Raider Logbook | 100 |
| Exodus Technical Handbook | 150 |
| ARC Data Module | 200 |
| Frigate Diagnostic Node | 1,000 |
Reserve 5 Battered Paperbacks for Research Station I installation before converting spares.
Set aside 3 Raider Logbooks for Station II, 3 Exodus Technical Handbooks for Station III and 3 ARC Data Modules for Station IV before converting spare research items. Keep five Battered Paperbacks for Station I installation as well. These items have station-building uses, not just research value.
The Frigate Diagnostic Node and spare ARC Data Modules are research items to watch for while planning ARC loot runs. Check the conversion value and the selected recipe together so you gather points toward a specific purchase rather than clearing out useful items blindly.
Use the station to target a missing unlock, then return to the appropriate crafting station for the gear itself. Blueprint research, crafting a weapon and amplifying that weapon are separate parts of progression. Do not spend a research budget assuming it also covers every later crafting cost.
Need help reaching your next research milestone? Choose an Outpost boost for the unlock or Research Station upgrade you need.
How to Get Amplified Weapons
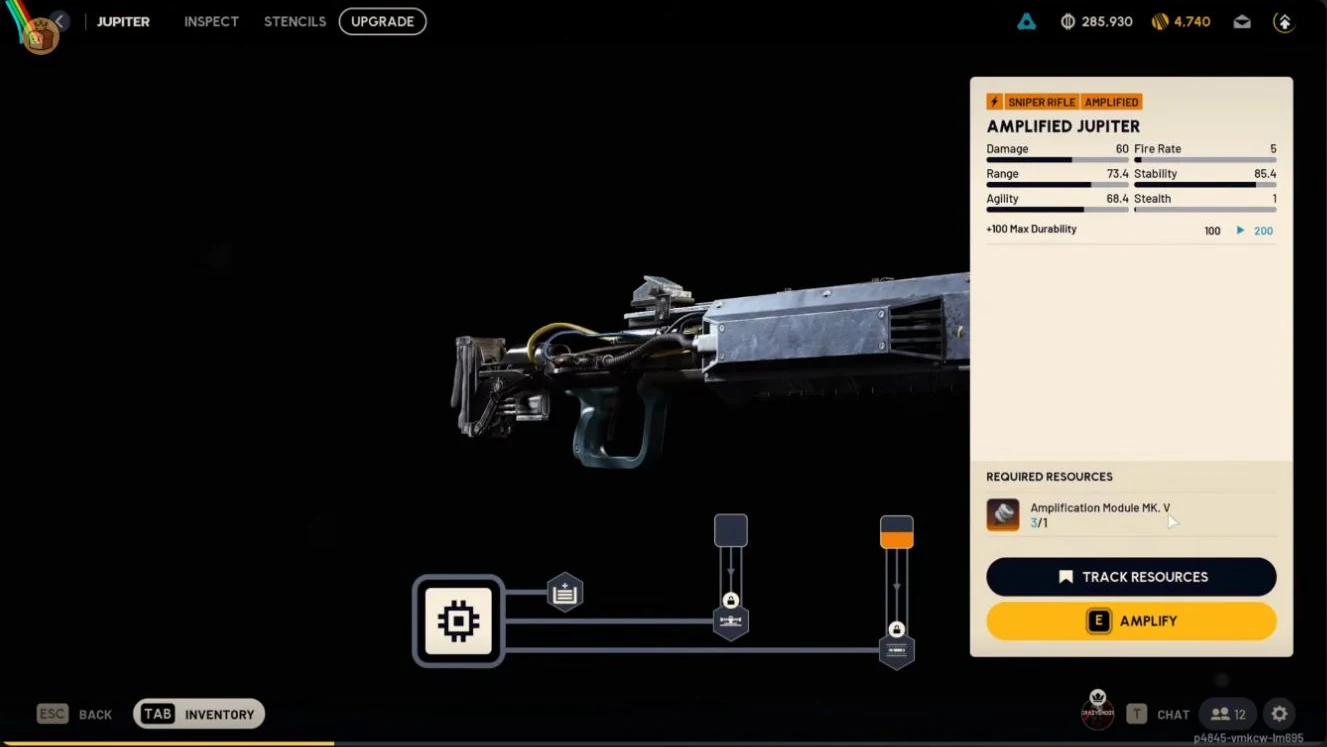
Use the AMPLIFY action at Gunsmith IV with the compatible Amplification Module shown for your selected weapon. Check that weapon's upgrade screen for its base conversion requirements. Research Station IV opens weapon-perk research, a separate task from amplifying the weapon itself.
Match the Module to the Weapon
Modules run from Mk. I to Mk. V. Read the required mark in the Gunsmith's Weapon Upgrades screen rather than treating Mk. V as a universal upgrade item. The module's own orange Amplified rarity is not a statement that it fits every weapon.
| Weapon | Required Module | Quantity to Amplify |
|---|---|---|
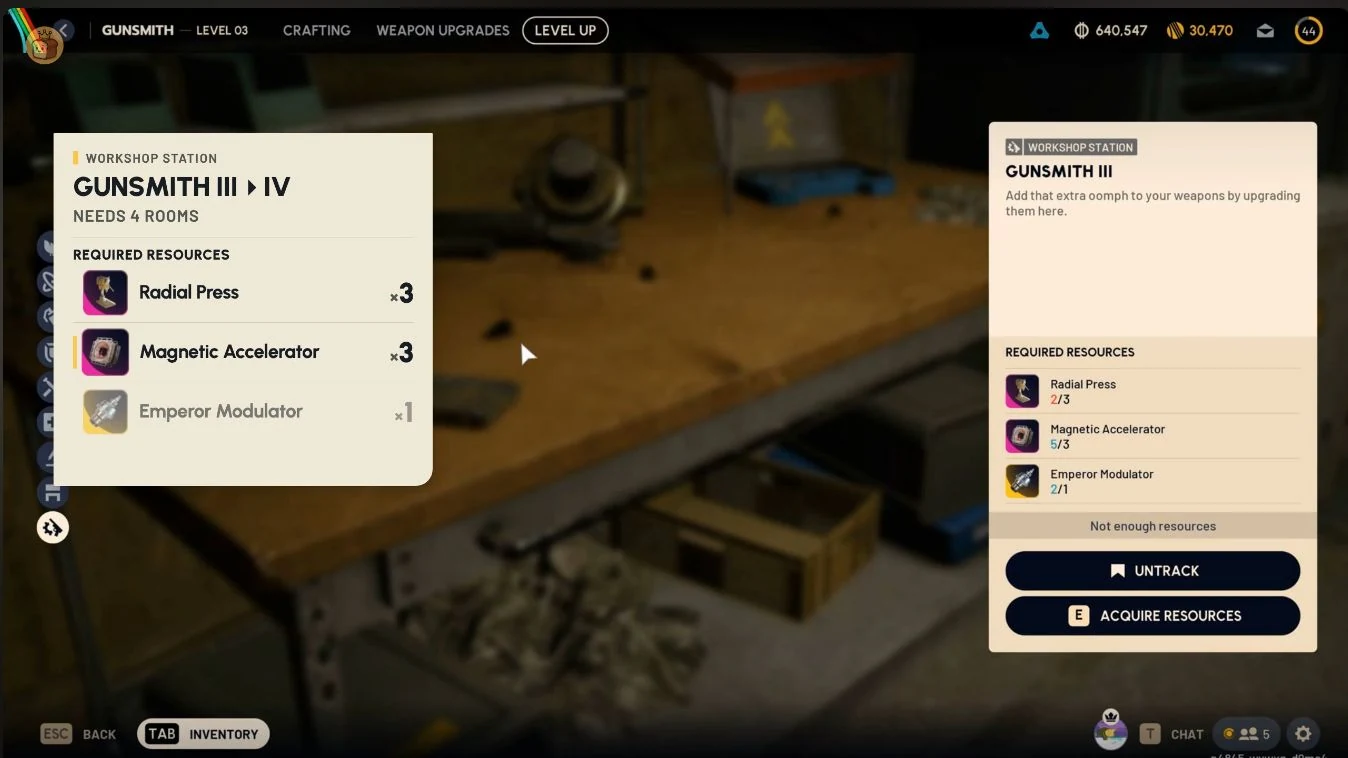
| Anvil | Amplification Module Mk. III | 1 |
| Aphelion | Amplification Module Mk. V | 1 |
| Bettina | Amplification Module Mk. IV | 1 |
| Burletta | Amplification Module Mk. II | 1 |
| Canto | Amplification Module Mk. III | 1 |
| Equalizer | Amplification Module Mk. V | 1 |
| Hairpin | Amplification Module Mk. I | 1 |
| Hullcracker | Amplification Module Mk. IV | 1 |
| Il Toro | Amplification Module Mk. II | 1 |
| Jupiter | Amplification Module Mk. V | 1 |
| Kettle | Amplification Module Mk. I | 1 |
| Osprey | Amplification Module Mk. III | 1 |
| Rascal | Amplification Module Mk. III | 1 |
| Rattler | Amplification Module Mk. I | 1 |
| Renegade | Amplification Module Mk. III | 1 |
The Mk. I module is for common weapon amplification, Mk. II for uncommon, Mk. III for rare, Mk. IV for epic and Mk. V for legendary weapon amplification. Do not confuse a weapon's normal upgrade level with the mark of the module it takes. Obtaining a module is also separate from paying for the research and upgrades you want to add afterward.
Start by choosing the gun, then inspect its amplification requirements and research paths. Do not buy a module purely because it has the highest mark.
Where to Look for Amplification Modules
The Frigate and the interior of the fallen Emperor are the module routes to plan around. Boarding the Frigate and Belly of the Beast are the related quests to keep in mind as you prepare those runs. Do not treat a module run as the same task as finding the Emperor Modulator for your Gunsmith.
Choose Your Amplification Path Before Committing
Weapon amplification changes the gun itself and cannot be reversed. Inspect the weapon's available branches before spending rare materials, especially when a choice closes off another option. Pick the behaviour you want rather than assuming every upgrade is simply a damage increase.
A full-auto Burletta, a scoped Renegade and incendiary Rattler rounds illustrate how different those options can be. Choose a supported weapon you enjoy using, then build your research and module plans around it. Furniture is not a substitute for either station upgrade.
Gunsmith IV and the Emperor Modulator
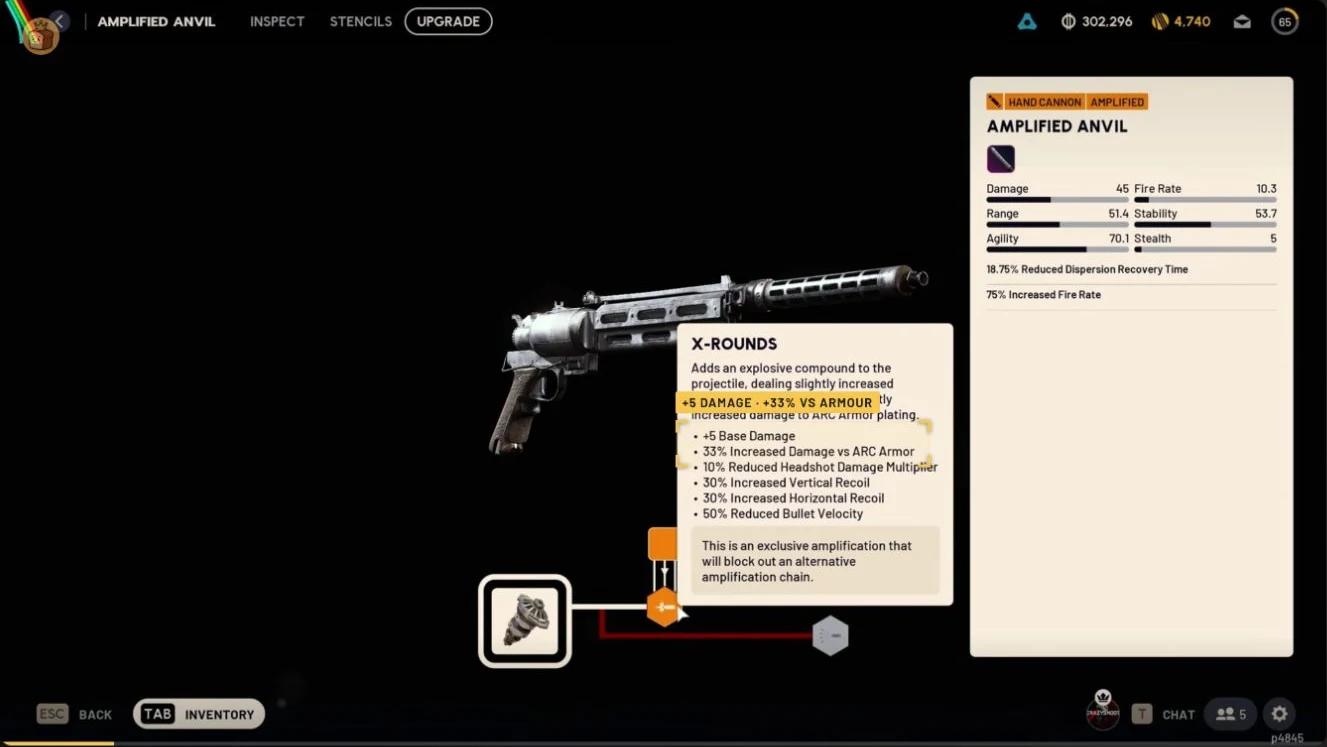
Gunsmith IV requires Outpost level 4 and its own material hand-in. The Gunsmith LEVEL03 panel offers the upgrade from III to IV. The Emperor Modulator is a station-upgrade component, not an Amplification Module that you socket into a gun.
| Material for Gunsmith III to IV | Required |
|---|---|
| Radial Presses | 3 |
| Magnetic Accelerators | 3 |
| Emperor Modulator | 1 |
Plan your search for the Modulator around the fallen Emperor's interior on Pendola Pass. Once you have it, keep it for the Gunsmith upgrade instead of treating it as spare salvage. Having a Frigate-sourced Amplification Module does not remove this separate station requirement.
Track the Gunsmith and Research Station independently. Reaching IV on one does not automatically raise the other, even though both become eligible through the same Outpost level.
Rooms and Floors
Outpost expansions add building space and open further progression, including Furniture Designs and higher station levels. Preview the room you want before installing it. Installed rooms cannot be moved or swapped afterward, so the room choice deserves more attention than a temporary furniture arrangement.
Your First Expansion
The expansion from Outpost level 1 to level 2 costs 3 Steel Cables, 20 Sheetmetal and 3 Cable Strippers. It opens Research Station II as a separate upgrade. Panoramic, Timeless and Chalet are room choices to preview, not a checklist telling you to install every style.
The Level 3 Expansion
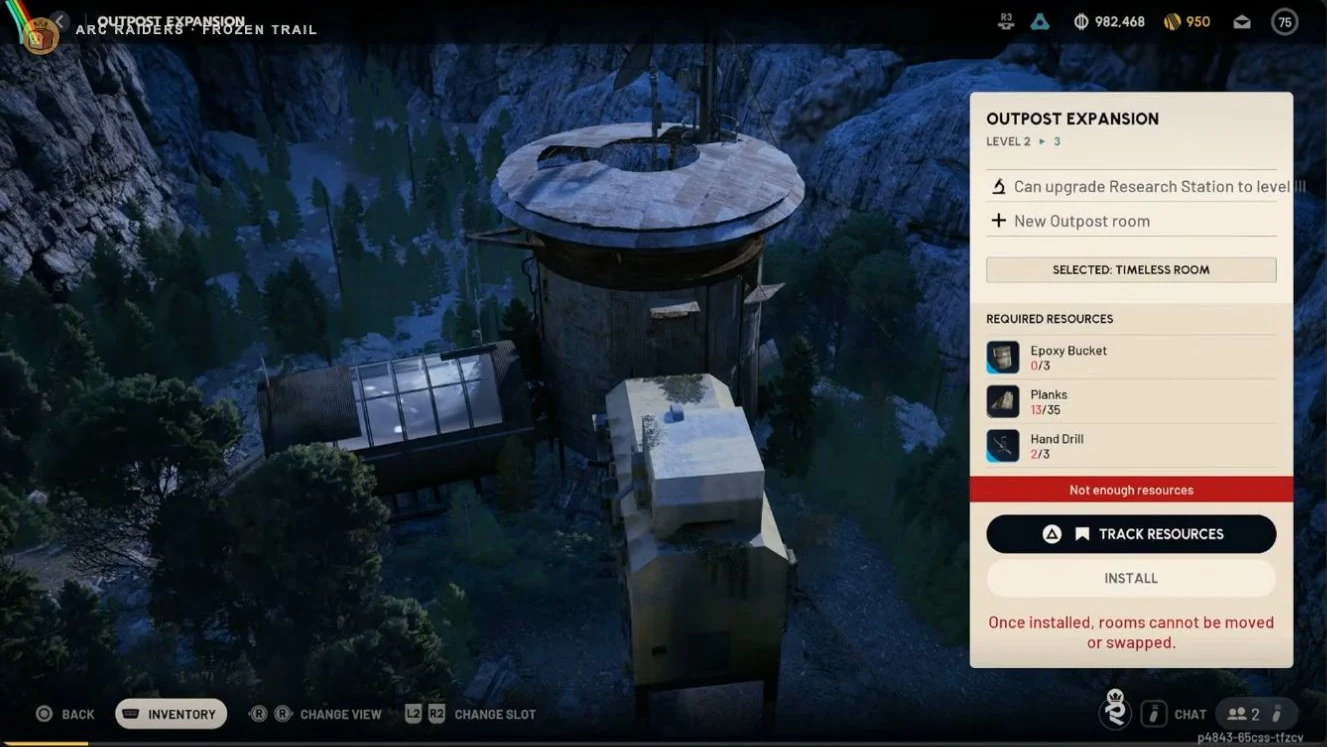
The expansion from Outpost level 2 to level 3 costs 3 Epoxy Buckets, 35 Planks and 3 Hand Drills. It opens Research Station III as a separate upgrade. Installed rooms cannot be moved or swapped, so preview your choice before installing it.
The Level 4 Expansion
The expansion from Outpost level 3 to level 4 costs 40 Sheetmetal, 3 Laser Levels and 3 Insulation Rolls. This is the Outpost milestone that opens both Gunsmith IV and Research Station IV. Budget for their separate upgrades after paying for the room.
Choose expansion for its space and progression unlocks, then furnish that space with the designs you like. Keep a small reserve of common building materials so an expensive decorative craft does not leave you short of the next structural upgrade.
Furniture Designs
There are 100 Furniture Designs across topside loot, Outpost progression and reward collections. They are decoration unlocks rather than combat upgrades, and they do not all come from raid containers.
| Design Source | Number | Collection Route |
|---|---|---|
| Topside | 73 | Find Designs while raiding. |
| Outpost upgrades | 22 | Progress the base to add its Design rewards. |
| Frozen Trail Pass | 4 | Obtain the Designs through the pass. |
| Collector Set DLC | 1 | Obtain the Design included with the set. |
Furniture Designs work like blueprints: learn the Design, then craft the decoration rather than relying on finding a finished furnishing. Some pieces can display trinkets you bring back from raids. That lets your collection become part of the room instead of remaining only a set of items in your stash.
Start with the furniture you actually want to place, and leave room around it for the decorating controls. You can work on the look of the base alongside research, but keep functional upgrade materials separate from your decoration budget.
Can You Walk Around the Outpost?
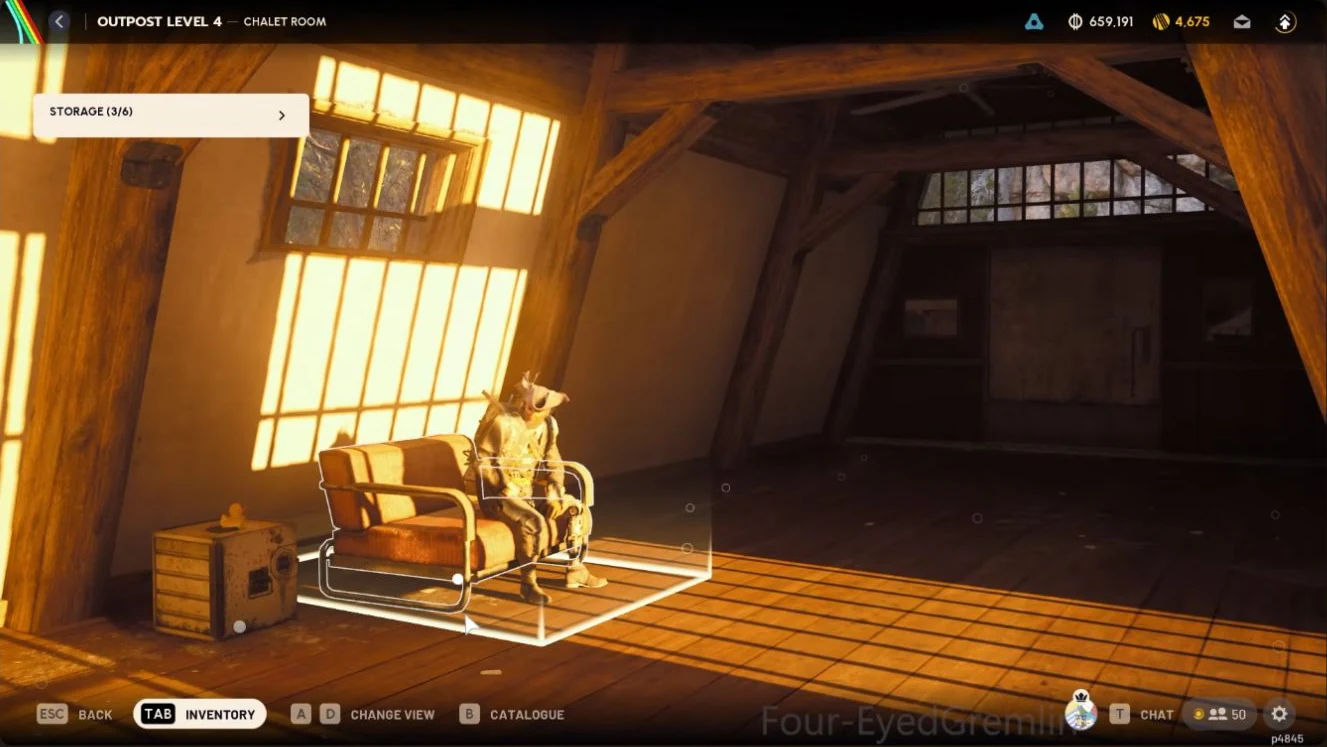
No. You cannot freely walk around your Outpost in-game. You move between fixed views to manage rooms and decorate, rather than controlling your Raider through a free-roam base.
Use the Outpost tab for the project, expansion and decorating controls, and the Workshop for station installation and upgrades. Changing the room view is not the same as moving your character through the rooms. Preview structural room choices before confirming them and keep selectable areas clear when placing large furniture.
Outpost Known Issues
Check the project and station controls directly when a notification or room view behaves unexpectedly. Not every missing prompt means you need to repeat the raid objective or collect the materials again.
| Problem | What to Check |
|---|---|
| No orange Outpost notification dot after the first stage objective | Open the Outpost tab yourself and check the objective and completion control. |
| Furniture clips into a room or obscures a selectable slot | Inspect placement and leave the selection area visible before adding more furniture. |
| The decorating camera catches on furniture or the character | Try another viewing angle before placing another large object. |
| The camera returns to the base room after leaving decoration | Select the room you were working on again rather than assuming the expansion disappeared. |
| Main-building lighting looks wrong with Shadow quality set to Low | Try a higher Shadow quality setting when inspecting the room. |
After a structural expansion, check each station's upgrade panel separately. A room that opens the next station level does not install that level for you. For separate raid objectives, use the ARC Raiders quest guides rather than looking for Sheltered Retreat in a trader's quest chain.
Frequently Asked Questions
Can you walk around your Outpost?
No. The in-game Outpost uses fixed views for moving between rooms and arranging furniture, not free-roam character movement. Use the room-selection and decorating controls to work on the base rather than looking for a way to enter it as a playable area.
Does the farmland photograph need an Advanced Camera?
No. A Basic Camera is enough for the farmland-house objective. Put the gadget in your loadout before deploying, use its picture control on a farmhouse around Ruined Homestead, and check the objective rather than buying a more expensive camera just for this stage.
Is the Emperor Modulator the same as an Amplification Module?
No. The Emperor Modulator is used for the Gunsmith IV upgrade, while an Amplification Module is used to amplify a compatible weapon. Keeping one does not replace the other, so track them as separate items when you prepare your station and weapon upgrades.
Should you spend every research item as soon as you extract?
No. Decide what you need for building and crafting before converting eligible items into Research Points. Battered Paperbacks, for example, are needed to install Research Station I. Keeping those five first is more useful than earning points while leaving the station itself unfunded.
Are all 100 Furniture Designs found as topside loot?
No. Topside loot accounts for 73 Designs, while the other 27 come from Outpost upgrades, the Frozen Trail Pass and the Collector Set DLC. A raid-only collection plan therefore does not cover every Design source, even when you keep searching new areas.
Build Your Outpost for the Upgrades You Want
Choose support for the Outpost unlock or Research Station upgrades, and keep your next progression milestone in focus.
Explore Outpost Boosts→Credits: Gameplay captures by TroubleChute Basics, Nickko Kimiko, McBread, Only Jamm, Four-EyedGremlin, MinMax Gaming, Arekkz Gaming.